

Model info
Content type:Accessories
Сreated by: JinxieWinks
Face Tracking: No
Full body: No
Nsfw: No
Views: 3 227
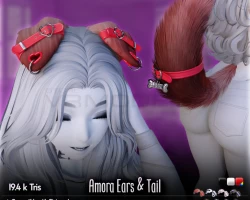
Amora Ears & Tail
To download the model, you need to log in.
Description
Stats
✦ 19.4k Tris
Ears: 4.9k
Ears Accessories: 2.6k
Tail: 7.4k
Tail Accessories: 2k
✦ 22 Bones (Mergeable bones not counted)
✦ 3 Base Color
Black
White
Red (Hue Adjustable)
✦ 2 Materials (Fur & Accessories)
Includes
✦ 2 FBXs (Ears & Tail)
✦ Blender Project File
✦ Unity prefab with Poiyomi materials and Physbones settings
Textures
✦ Compatible with Cicieaaa's Hair Texture pack
✦ Only ONE hair card texture are included in this package. You can download the rest of the pack completely FREE from Cicieaaa's store
Requirements & Suggestions
✦ A general knowledge of Blender and Unity.
✦ Poiyomi v9.0.54 or greater if you wish to use the included material
✦ VRC SDK v3.2.3 or greater(?) if wish you to use the included Physbone settings
Tips, Suggestions & Common Issues
✦ Easily customize metal color within Unity. Check the included material for an example.
✦ PLEASE take note of the transform exclusions in the included PhysBone prefabs. The ignore list will be blank if you copy/paste the component or
they will reference the wrong objects in the scene. I recommend manually replicating how I have set up my ignore lists for identical results.
Common Questions
The included FBXs are triangulated. Is this intentional?
Yes, this is so that the triangulation is same as it was when originally textured in Substance. The orientation/configuration of triangles can influence how a texture is mapped across its surface. Unmodified meshes can always be exported with the included Blender file by simply disabling the triangulation modifier before export.
What are PBR textures?
They're a collection of maps that aim to realistically simulate how light reacts with different surfaces. Those textures can be used in just about any 3D program that supports it. However, maps specific to Poiyomi's implementation are also included for convenience.
How do I correctly append the included Blender file?
Everything is organized into collections for convenience. So the process is as simple as File > Append > [Included .blend file] > Collection > Pick Optional Sub-Collection